Here is a full guide on how to complete Tricky Doors walkthrough level 7 puzzle game, which is called Hospital.
Tricky Doors is a puzzle game where the aim of the game is to escape the room by completing different mini-puzzles and finding objects in the rooms to help you. This game is available to download and play on the Nintendo Switch, Android and iOS devices and is a free-to-play game.
There are new levels that are still being released and we will do our best to create the walkthroughs/guides to help you complete the sections you may be stuck on as quickly as possible. This article will show you how to complete the seventh level of the game, which is called Hospital.
Tricky Doors Walkthrough Level 7 – Hospital
Here is our Tricky Doors Walkthrough Level 7 Guide:
To get access to the seventh episode or level, you will need to complete the first six, which we have done full detailed guides for, which you can see by clicking here. Tricky Doors have names for the different levels and the seventh one is called Hospital. Once you have clicked to play this level, you will see the following information:
“This isn’t an ordinary hospital. It has its own secrets. You’d better not try to solve all its mysteries. The only thing you should care about is finding a way out. But this time your fate isn’t up to you alone.”

Once you click on ‘play’ you will be transported to the first room of the hospital where you can see a bed with a patient in it in the middle of the room and a desk. There are a few objects that you can collect from this scene, which are:
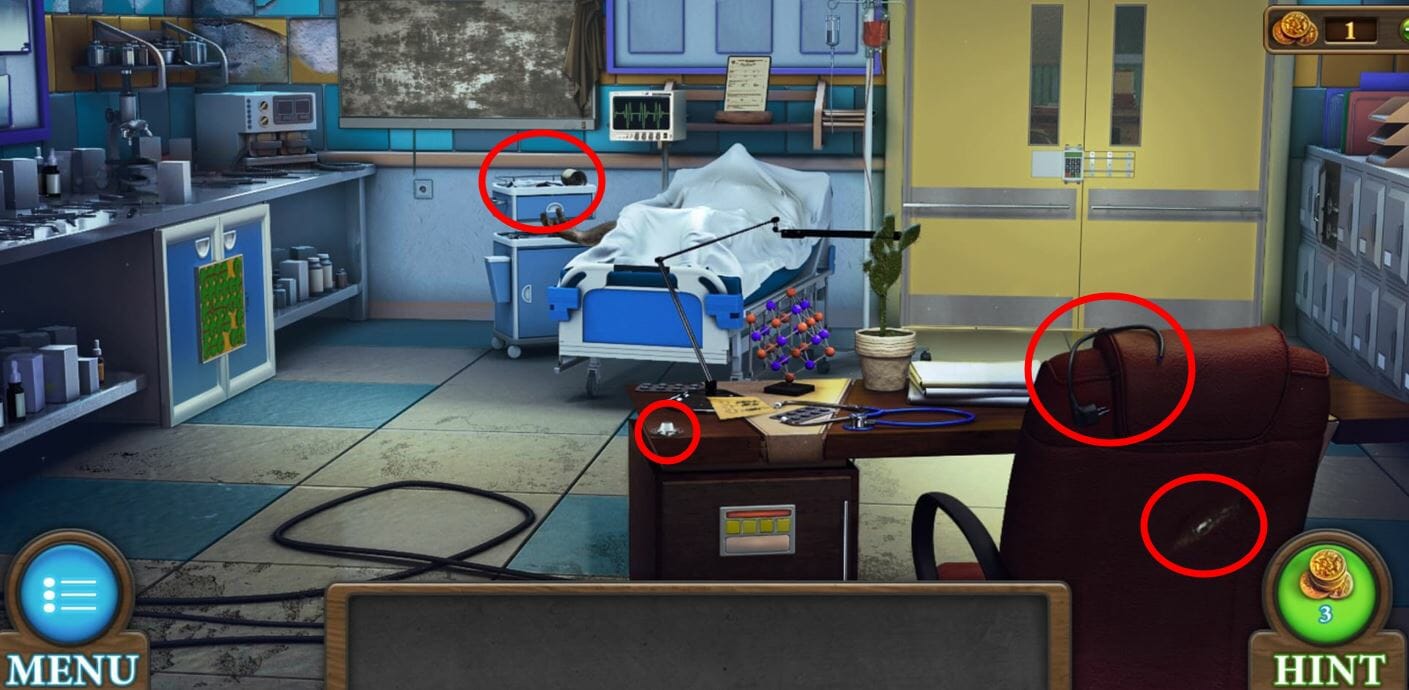
- Cord – On top of the chair in front of the desk.
- Handle – Click on the desk to make it larger and you will be able to get a handle on the left corner of the desk.
- Scalpel and Ammonia – On the tray on the left side of the patient you can collect both these items from there.
- Handle – You can now use the scalpel on the back of the chair where you can see a stitch. This will add another handle to your inventory, which is the last one to get.
We have highlighted where these items can be found in the image below if you are struggling to locate them:
There is a slightly opened locker on the right side of the room and once you click on it to get a closer look, you will be able to add the two handles you have in your inventory to this. This will unlock the mini-game where the aim of the game is to scroll the handles to enter the correct codes.
The answer was on a piece of paper on the desk and it looks like the codes are different for each player. Here are the codes we have to input:
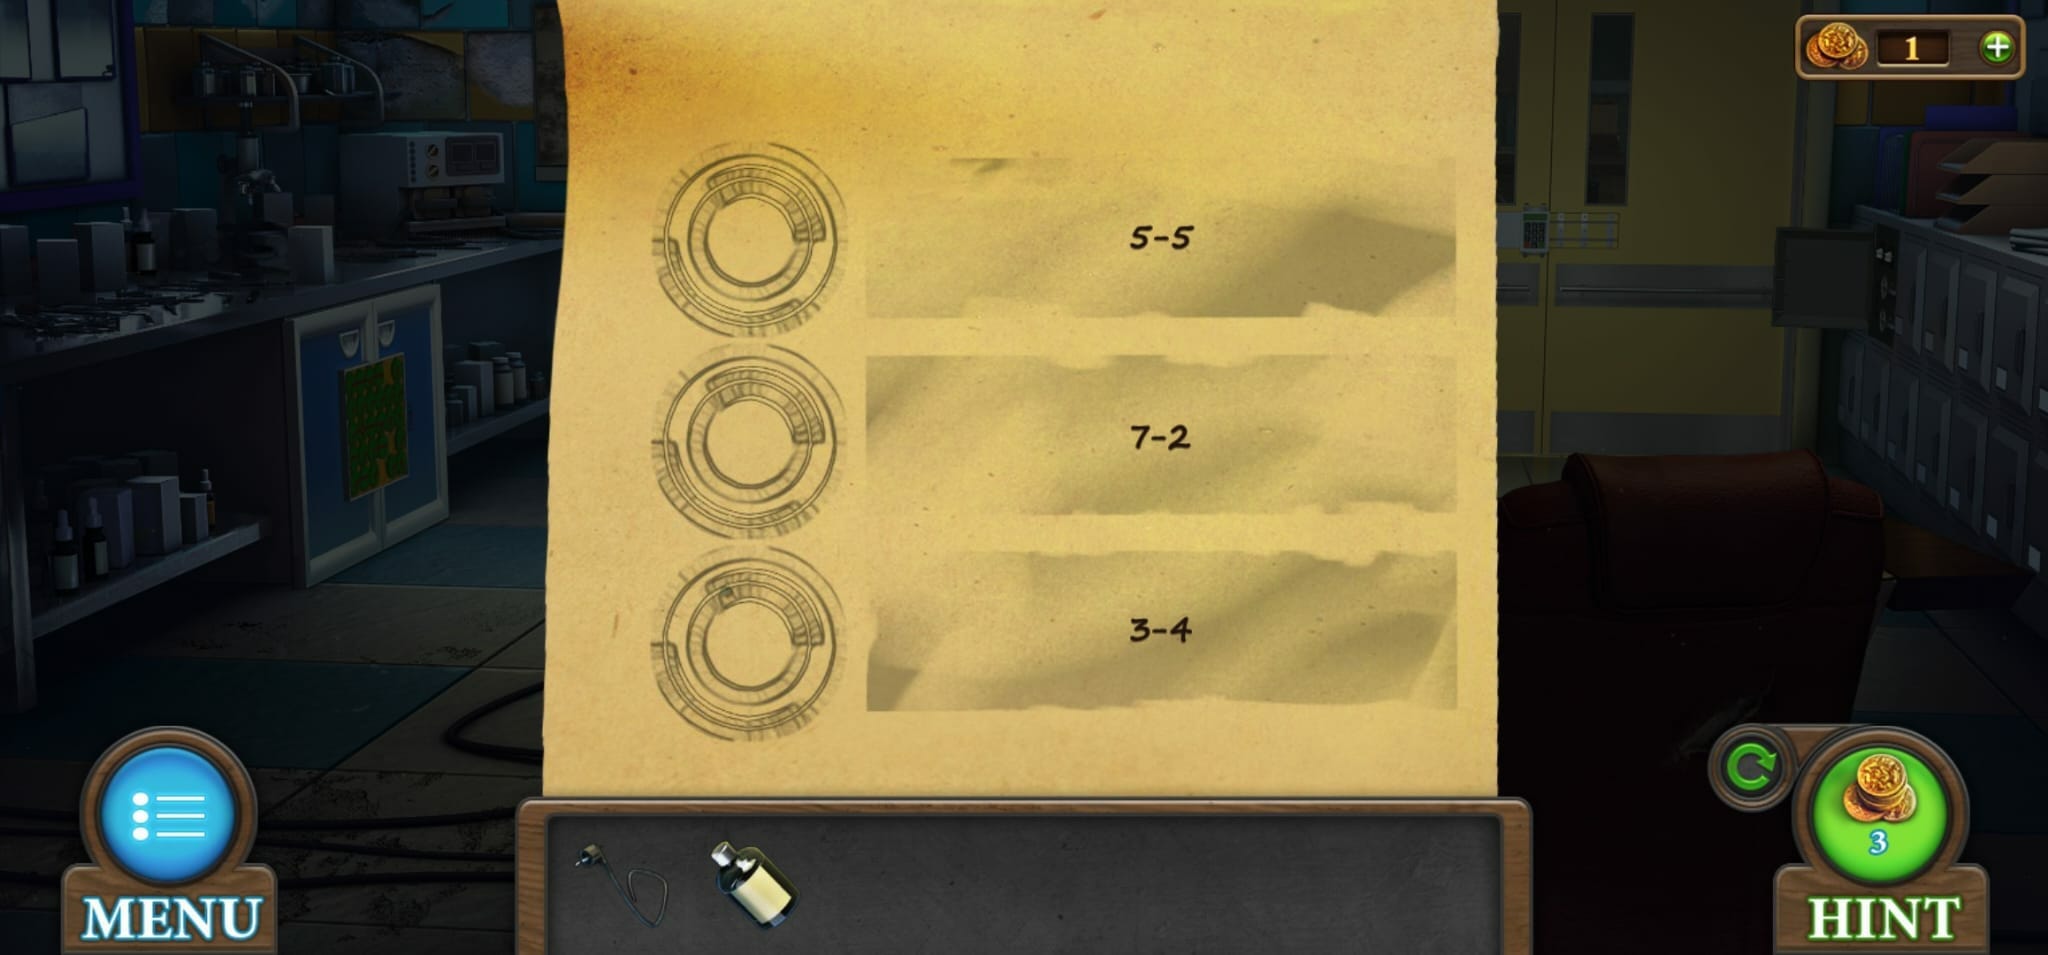
Once you have input all three codes, the mechanism will unlock to reveal the contents behind. You can collect the x-ray images and token from here. There are still two more tokens left to be found.
In the back of the room, there is a board which appears to be stained with grease. You can add the ammonia to the cloth hanging on the right of the board to wipe it clean.
The x-ray scans can be added to the board and the cord that was found earlier can be added to the plug at the bottom of the board. It shows that there is 1, 3, 4 and 2 objects in each section, which is a code we need for the door on the right.

This will unlock a mini-game next to it, where you need to turn the block to create a line along which the token can be drawn to the exit. The arrows on the left are used to control the token and you need to click on the blocks to move them around.
The starting positions of the pieces will be different, but we will show you where you need to position the blocks to help you complete the puzzle.
First you need to change the block underneath the one where the token is (bottom left) to make the line that bends around to be at the top. You can then move the token down to the end of the line.

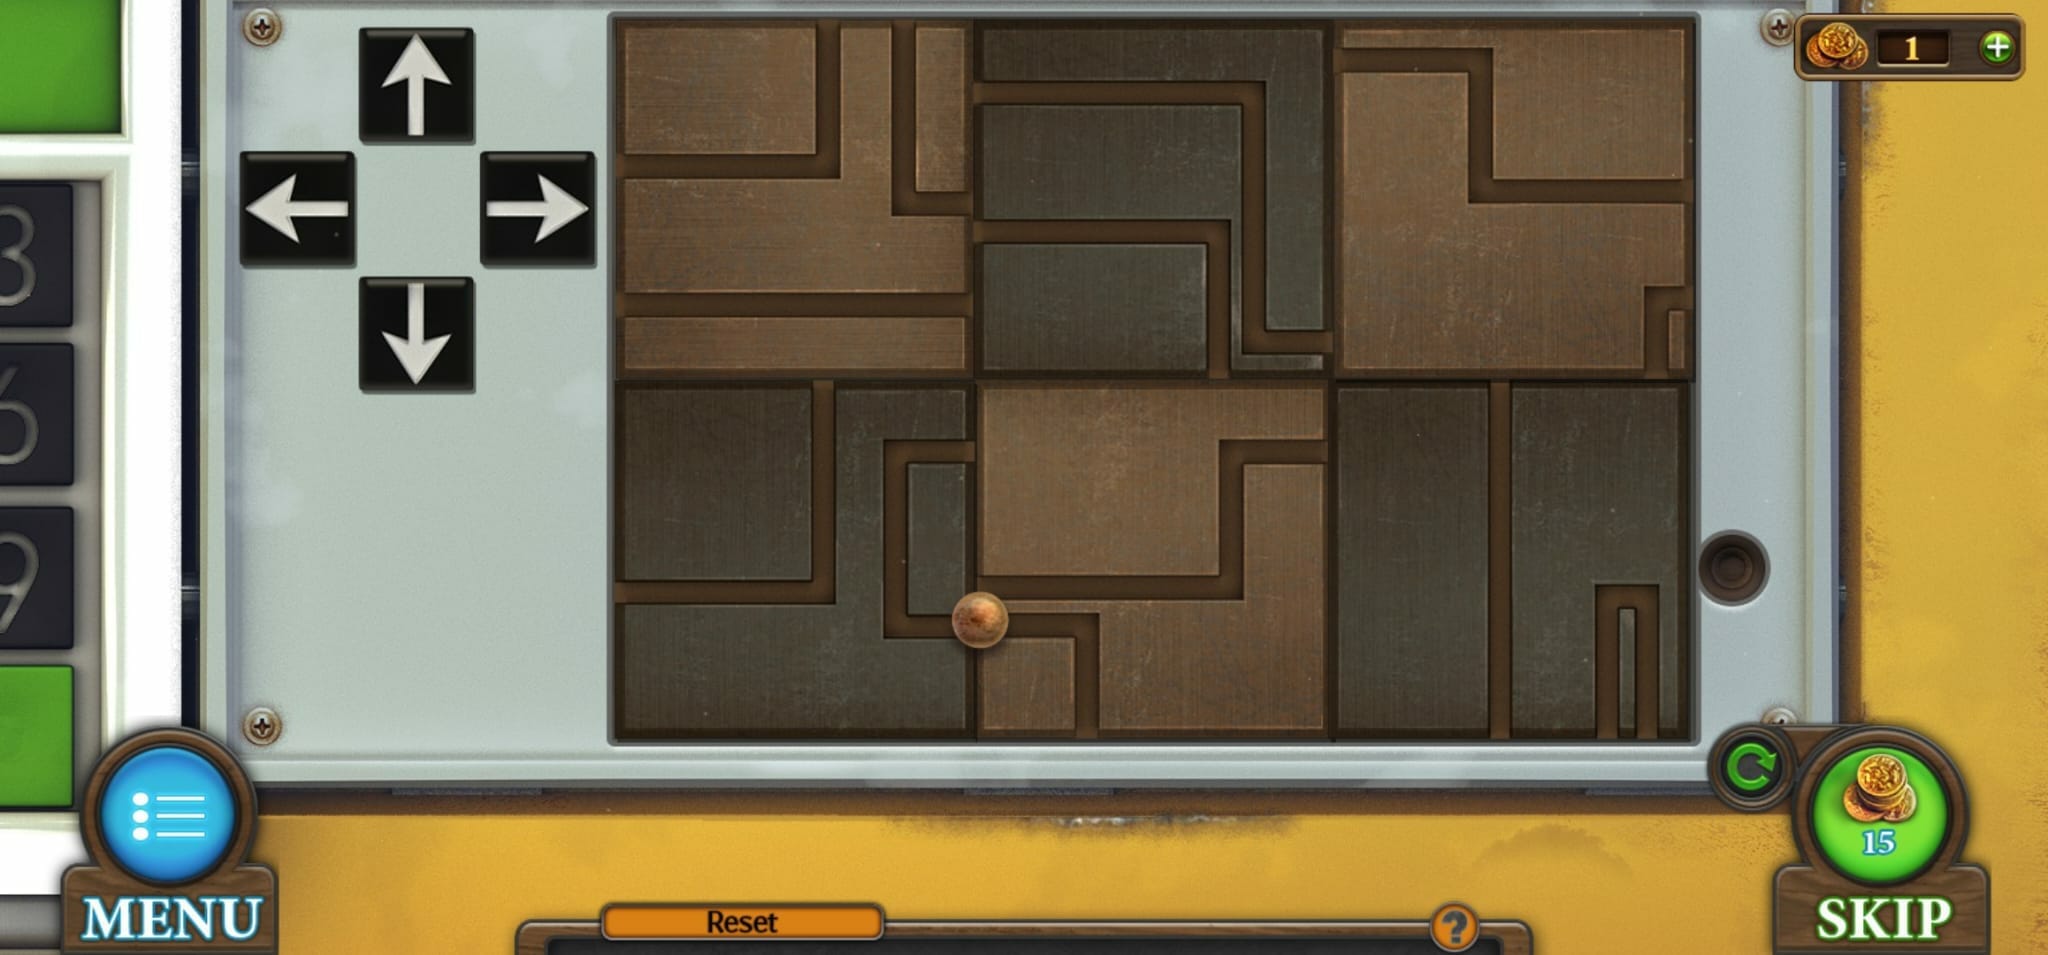
You then want to click that block around so the token in on the right of the block. The bottom middle block then needs to move so that the lines are matching and the line will go to the bottom, as seen in the image below:
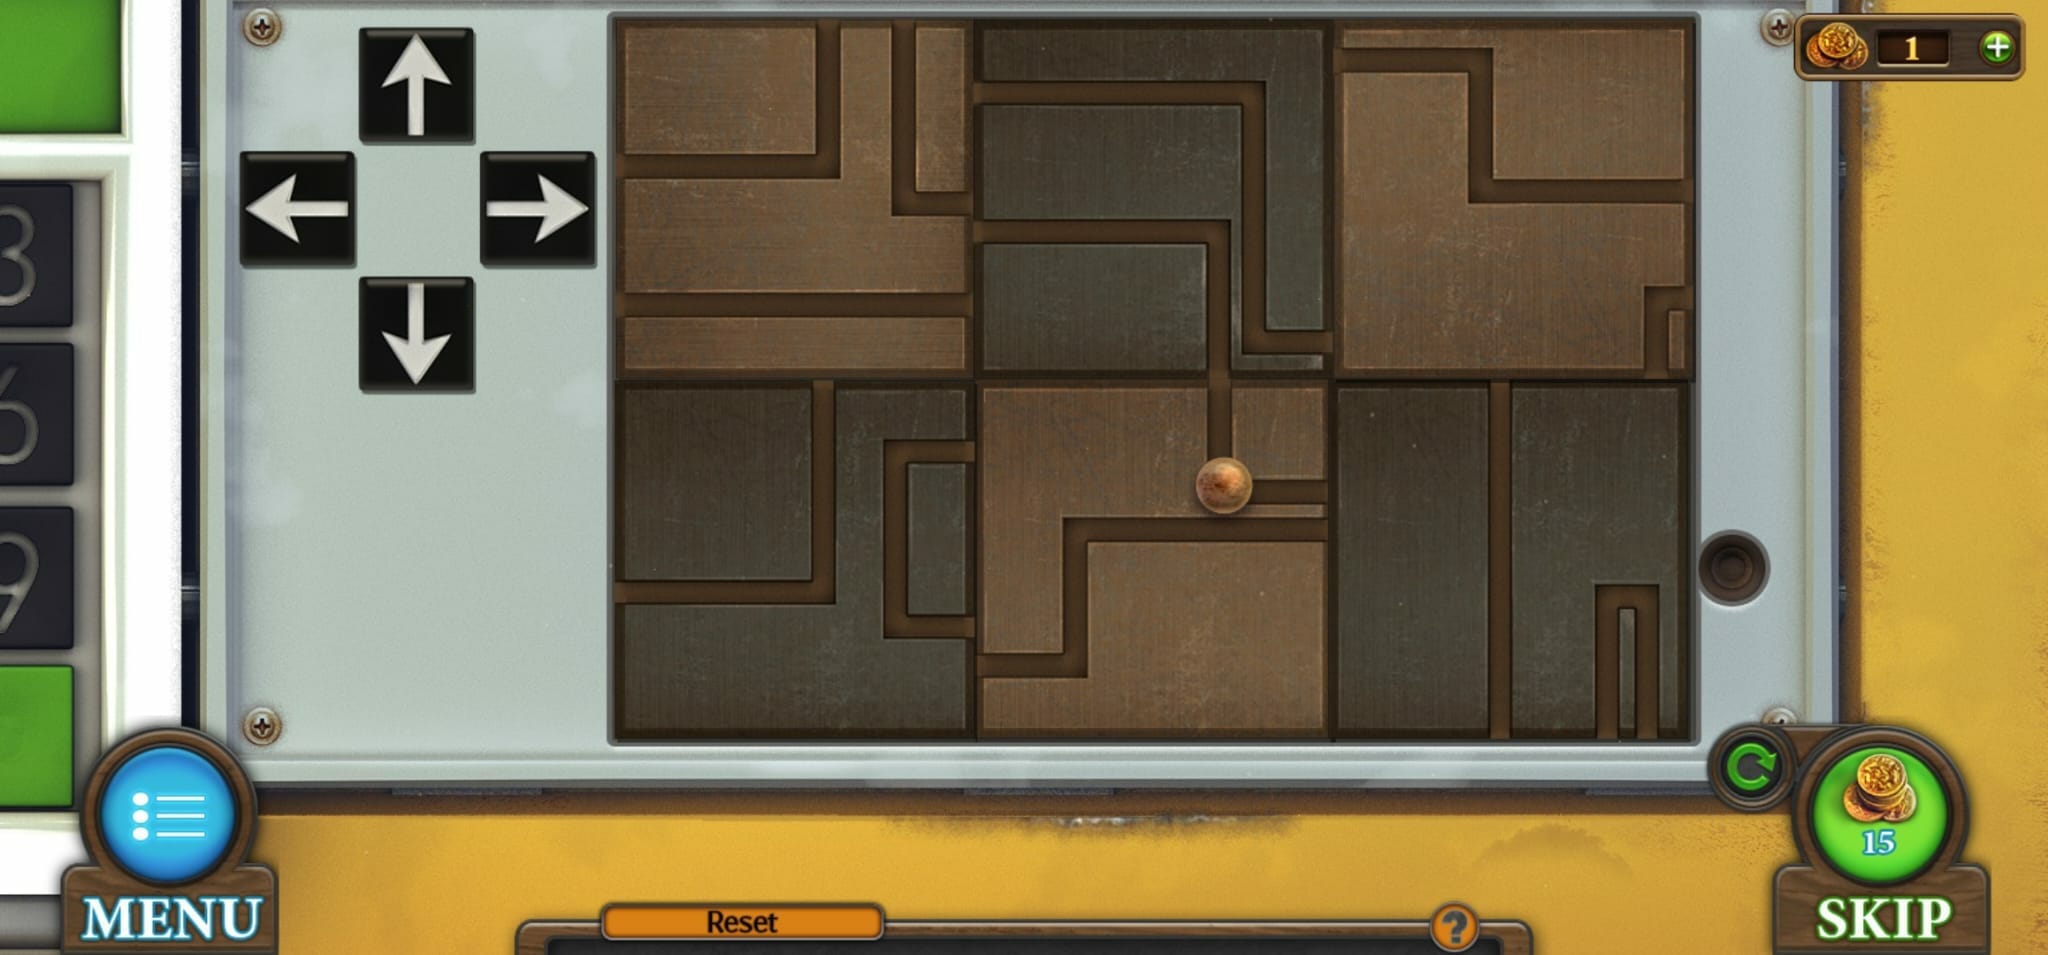
You then need to move the token so that it is in the left top corner of the block and then move the top middle block so the lines are touching if the blocks are not lined up for you, but in our puzzle, the block is already in the correct position and here is what it should look like:
You will then need to move the top left block to match where the token is as well as the bottom left block and bottom middle block so there is a line the token can travel to.
Here is what the blocks should look like when you have moved all three of them:
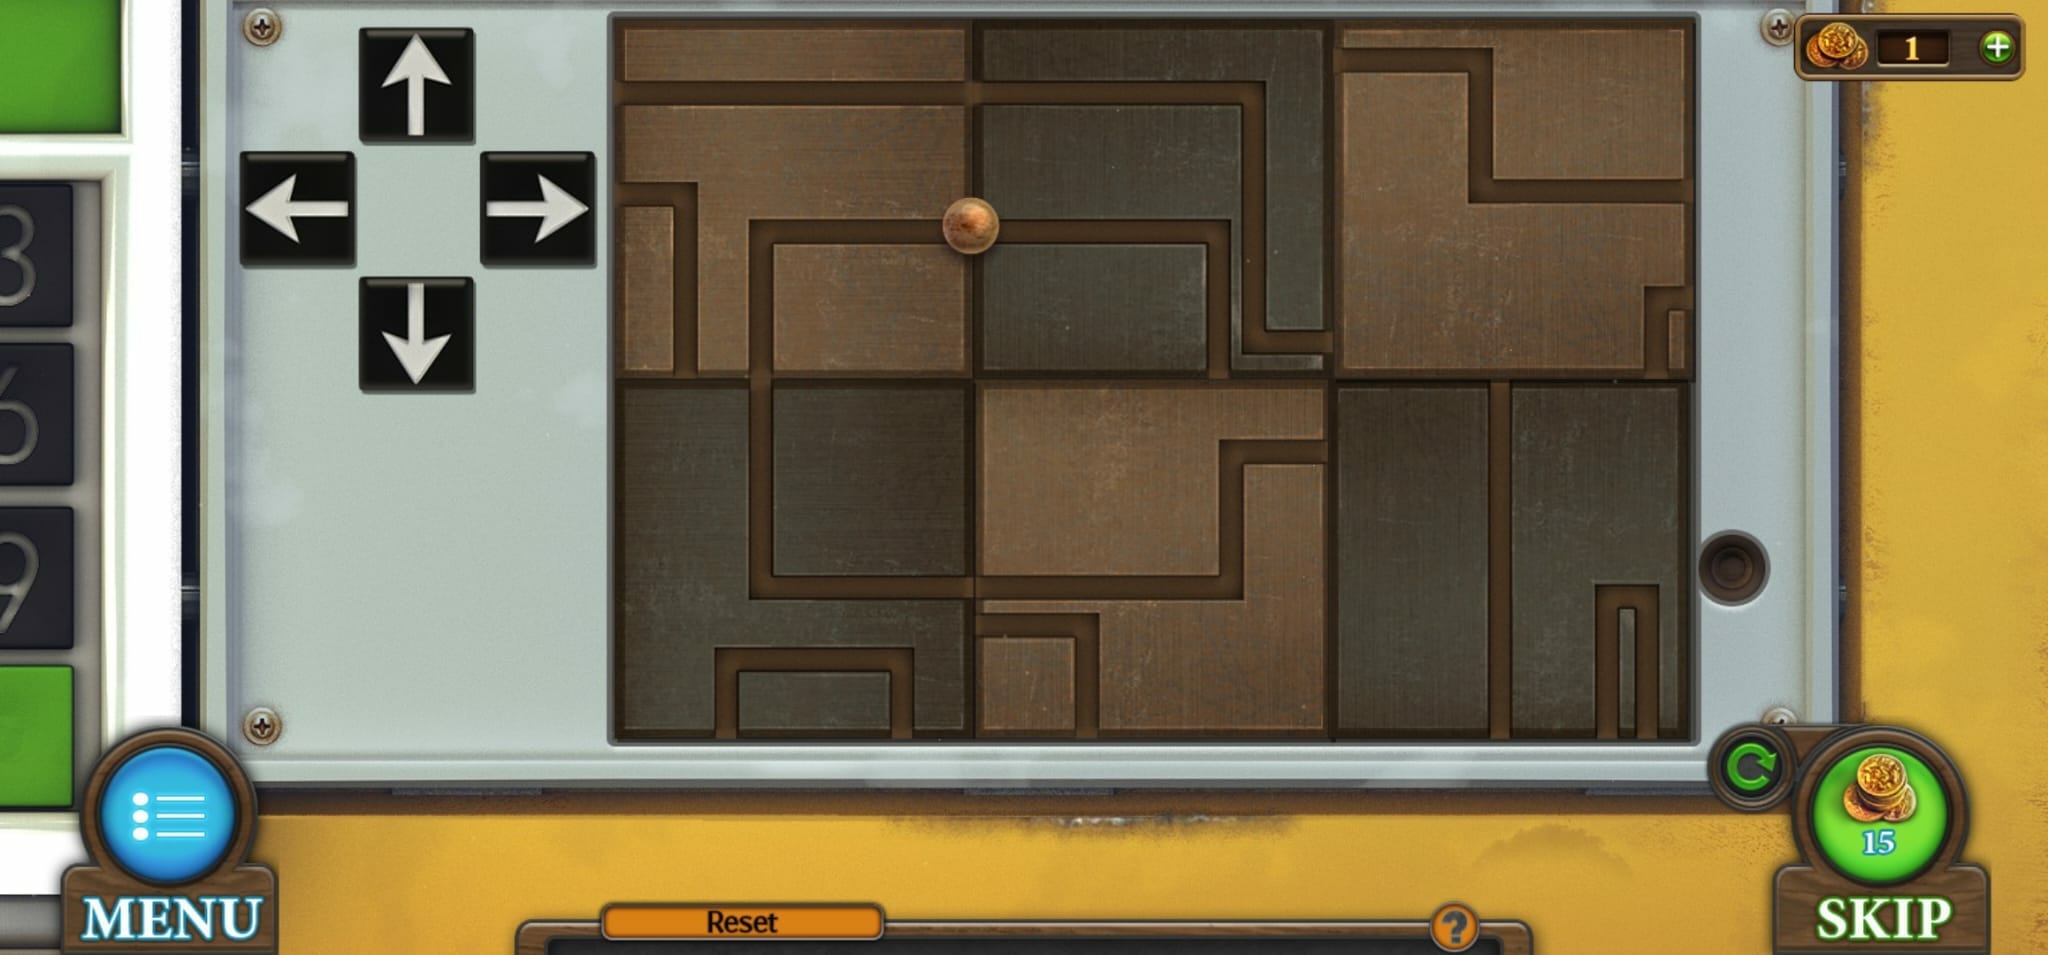
Once you have done that and moved the token so it is in the bottom middle block, you need to move the bottom middle block and the top middle block to create a pathway upwards.
Here is what that looks like:

Move the token up to the top block and then rotate it so the end path leads to the top right block. The top right block can then be moved to join the top middle block and the bottom right block. The bottom right block also needs to be moved to line up with the top.
Here is what it should look like when you have moved these blocks:

You want to move the token all the way to the end of the path in the bottom right block and then you need to move the top right block so the other line matches up.

You then want to move the token to the end and then move the top right block around to match the bottom right block, which should already be in the correct position.
Once you have them lined up, it should look like this:
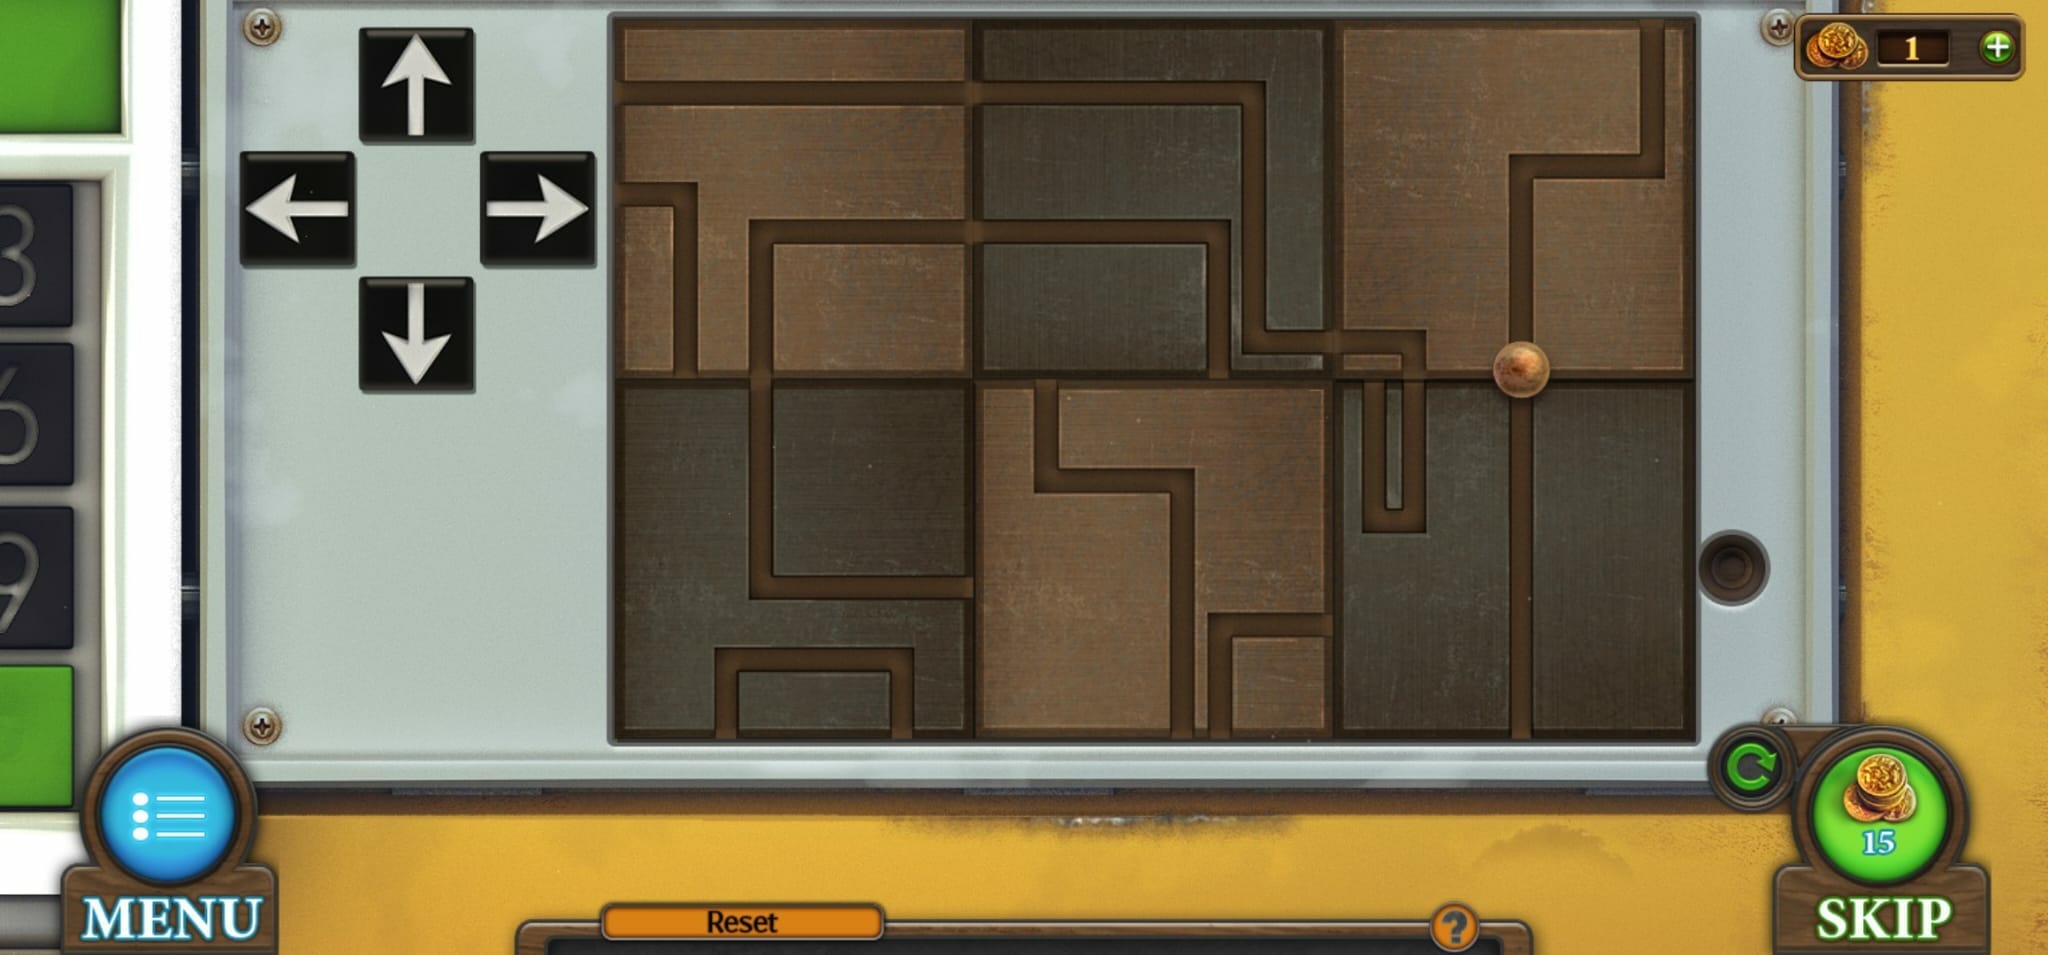
All you then need to do it move the token down and then rotate the bottom right block so that it lines up with the hole at the end. Here is what it looks like in the correct position:

Once you have completed the puzzle, it will open the door and you to the second scene, which is the reception area of the hospital. There are only a couple of items you can collect from here at the start which are the glue and ruler, situated on the right side of the front desk, as highlighted in the image below.

We have also highlighted the multi-colored folders on the desk as this is the code needed for lock on the drawer on the desk in the first scene. The color combination is:
RED, YELLOW, BLUE, GREEN

You need to click on the bar at the bottom as well to activate it and this will open the drawer. The items you can collect from the drawer are:
- Part of a card
- Glass pipe
- Screwdriver
Now you have the screwdriver, you can go back to the reception area of the hospital and there is a bench you can move forward. This will allow you to get to the grille and you can use the screwdriver to open it up.
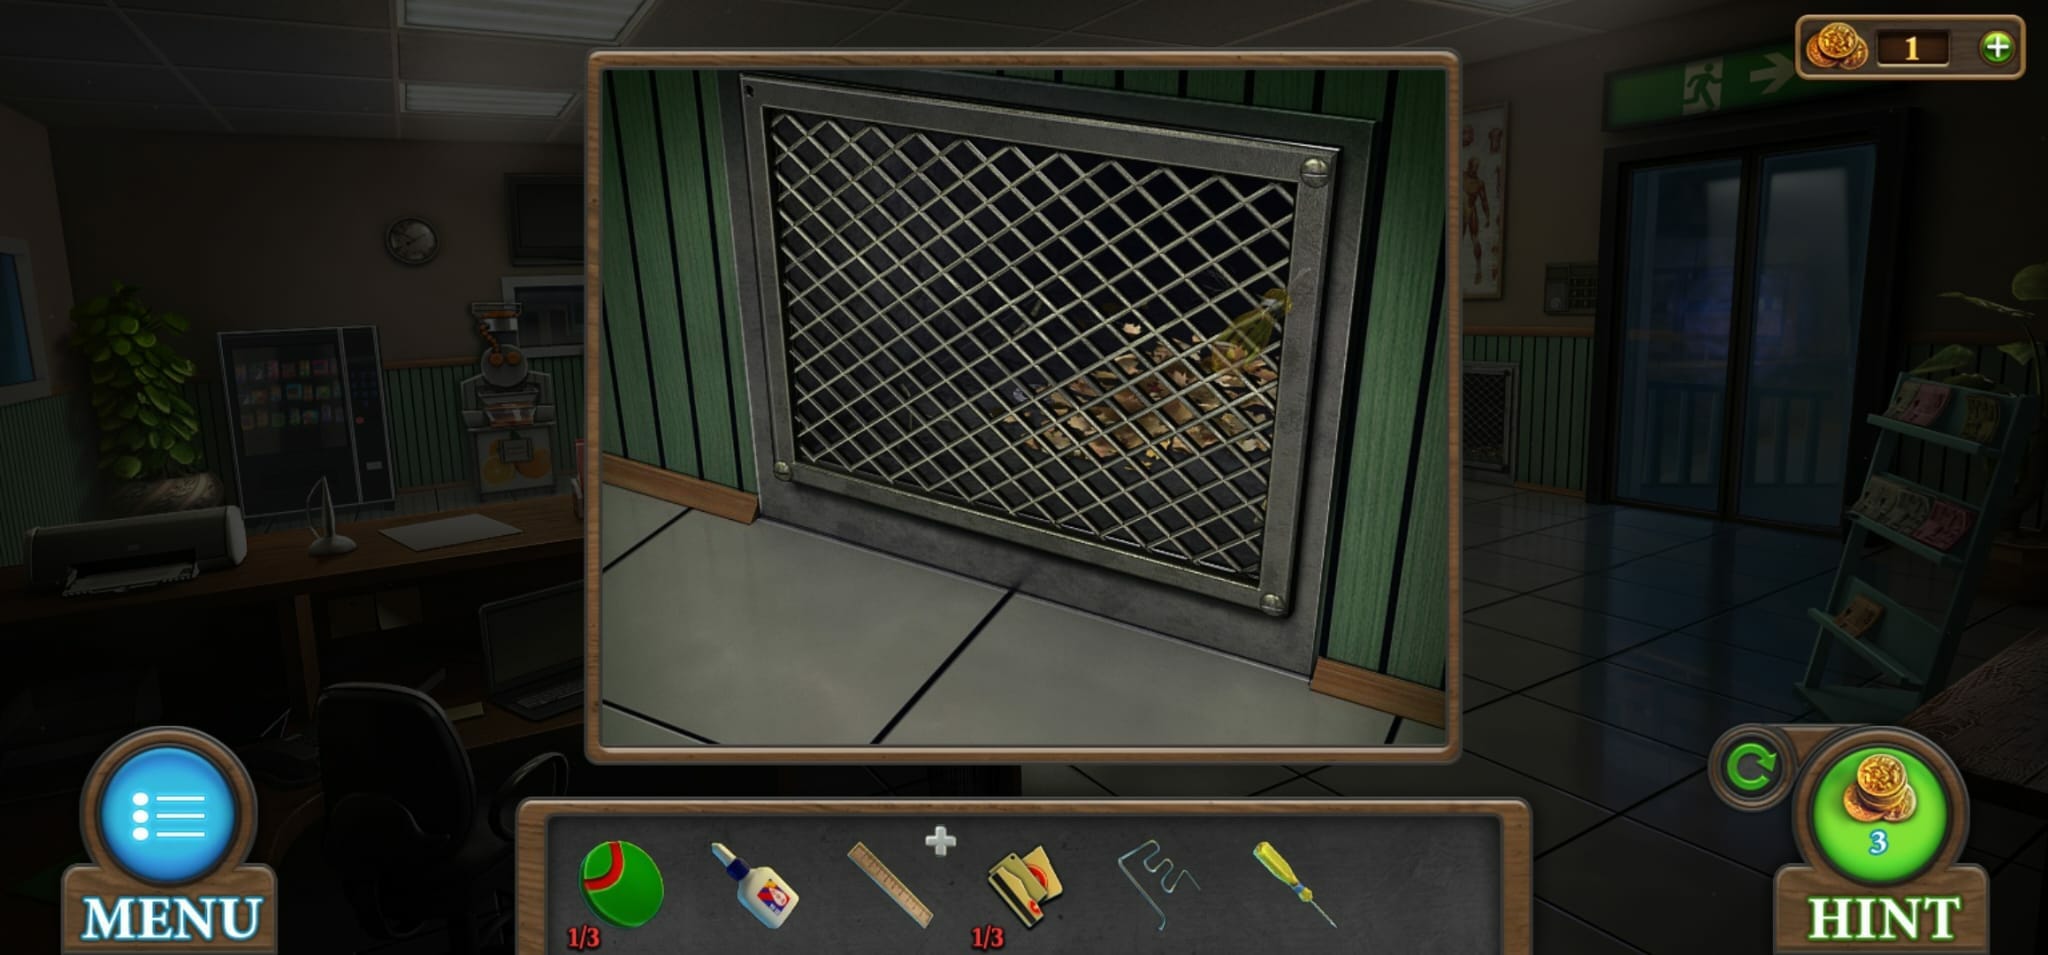
You then need to move the leaves aside and you can grab a lighter and a key from here. You can now use this key on the desk drawer.
This will unlock a mini-game and you play this game by pressing the button so the token will move by the number of cells indicated on the button. Use them to put the tokens to their places.
Unfortunately, the puzzle is not the same for everyone so we cannot give you the step-by-step guide on how to complete it.
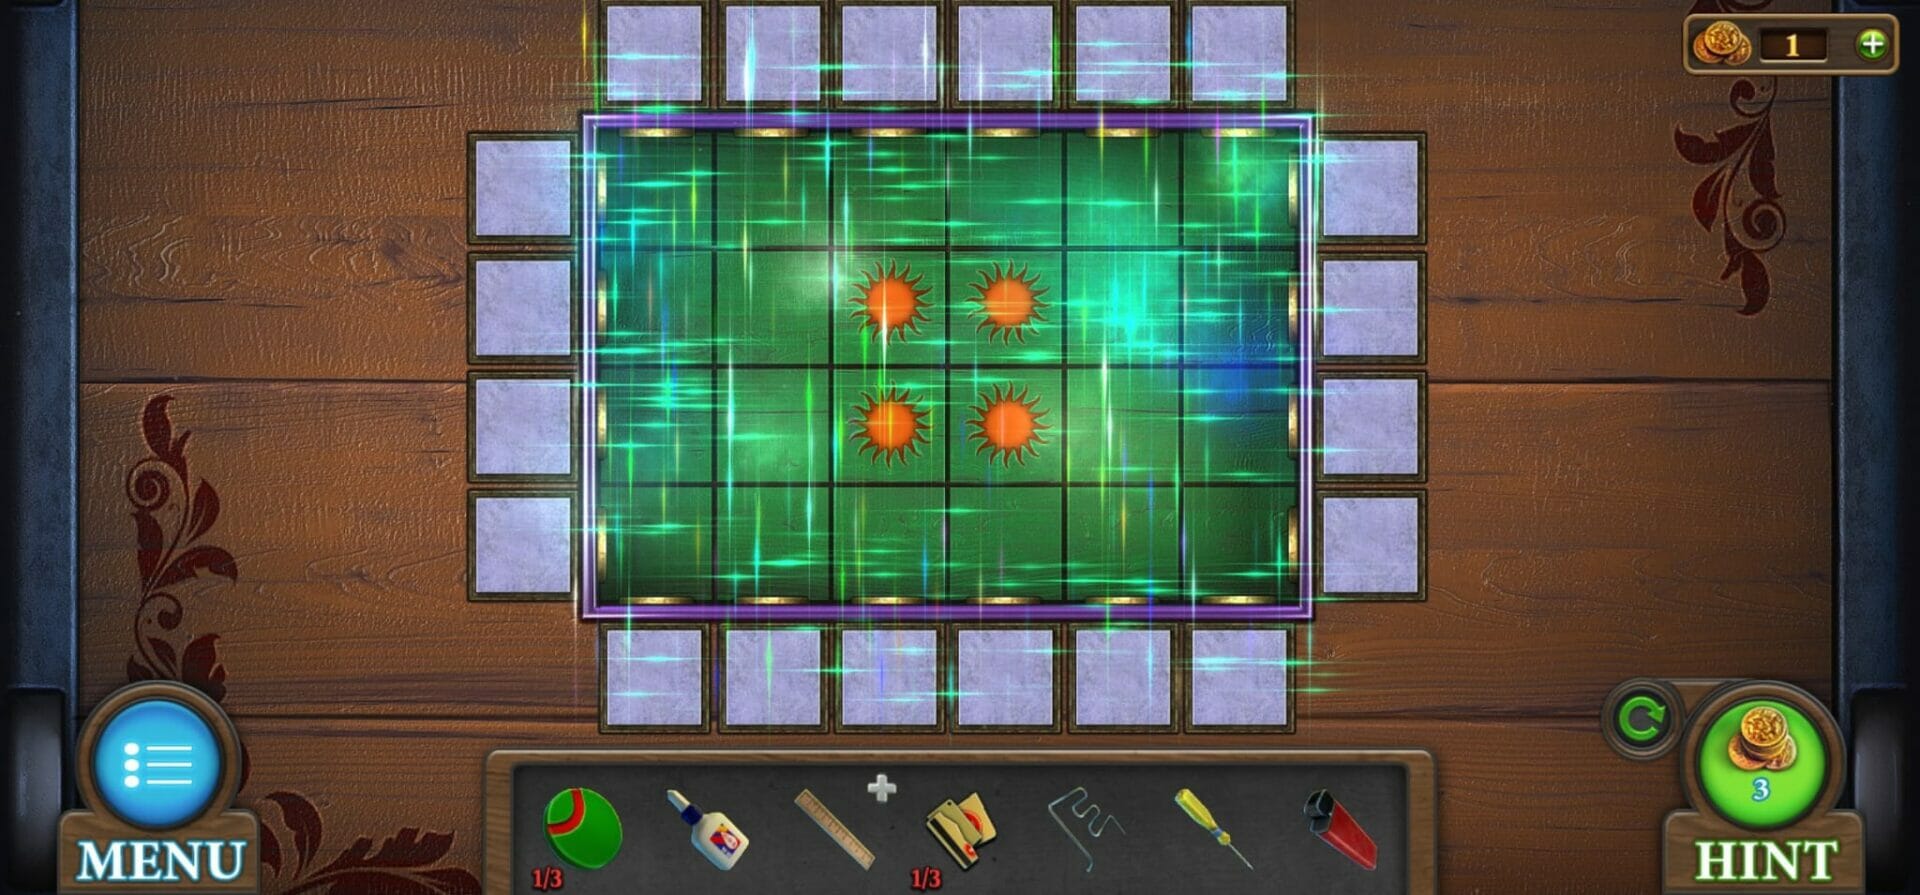
Once you have completed the puzzle, there will be a couple of items you can retrieve from the drawer, which are a part of a card and a coin.
You can use this coin on the vending machine at the back to the left of the room. Punch in the number 11, which is the number 11 as this is the same snack as the wrapper that was in the drawer.
This will release the last part of the card you need. Now you can click on the ruler, card parts and the glue to join all the pieces together to make a key card.

The key card can then be used on the door at the back, unlocking a new room. There are only a couple of items you can collect from this room with the first one being a spatula, which is at the back on the shelving unit.
You will also need to click on the sink and then on the tap. This will tell you that there is no water in the tap and then you can use the screwdriver in your inventory on the tap to get the valve.
The next step is to go back to the reception room and click on the juice machine, where you will be able to add the valve to the tap. This will make the juice flow and reveal a code at the back, which is 6371.

If you go back to the last room, you can now enter this code on the locker which is on the right side of the room. Once you have entered the code, you will get a token and a flash drive.
Now you will need to go back to the first room and click on the plant pot on the desk. You can use the spatula on the plant pot to reveal the last token you need and a heat tablet.

You can now add the tokens to the cabinet on the left side, which will unlock a mini-game. The aim of the game is to assemble the pattern so that all the lines are connected.

There are three different stages you need to complete and once you have completed them all, you will unlock the cabinet. The only thing you can retrieve from it is a key on the top shelf, on the right.
Now you need to go back to the third scene and you can add the key to the lock on the refrigerator to open it. You can retrieve a syringe from the second shelf and also a handle from the drawer at the bottom.
You can go back to the reception and add the flash drive to the laptop on the desk and you will then need to put in a four-digit passcode. If you look on the clipboard behind the patient, there is a number, which is 7458.

This the code you need to put on the laptop. This shows you a recipe needed for the werewolf in the hospital bed. If you go back to the cabinet in the same room as the patient, you can now click on the open cabinet and add the green test tube to your inventory.
You can get the red test tube from the last room on the left at the back of the room, where the beakers are and the purple test tube from the refrigerator. The next thing you need to do is to click on the centrifuge which is on the shelves at the back of the room in the middle.
The red, green and purple test tubes can all be added to this and you also need to add the handle to the bottom of the device. You can then start the machine, which will give you a test tube of mixture.
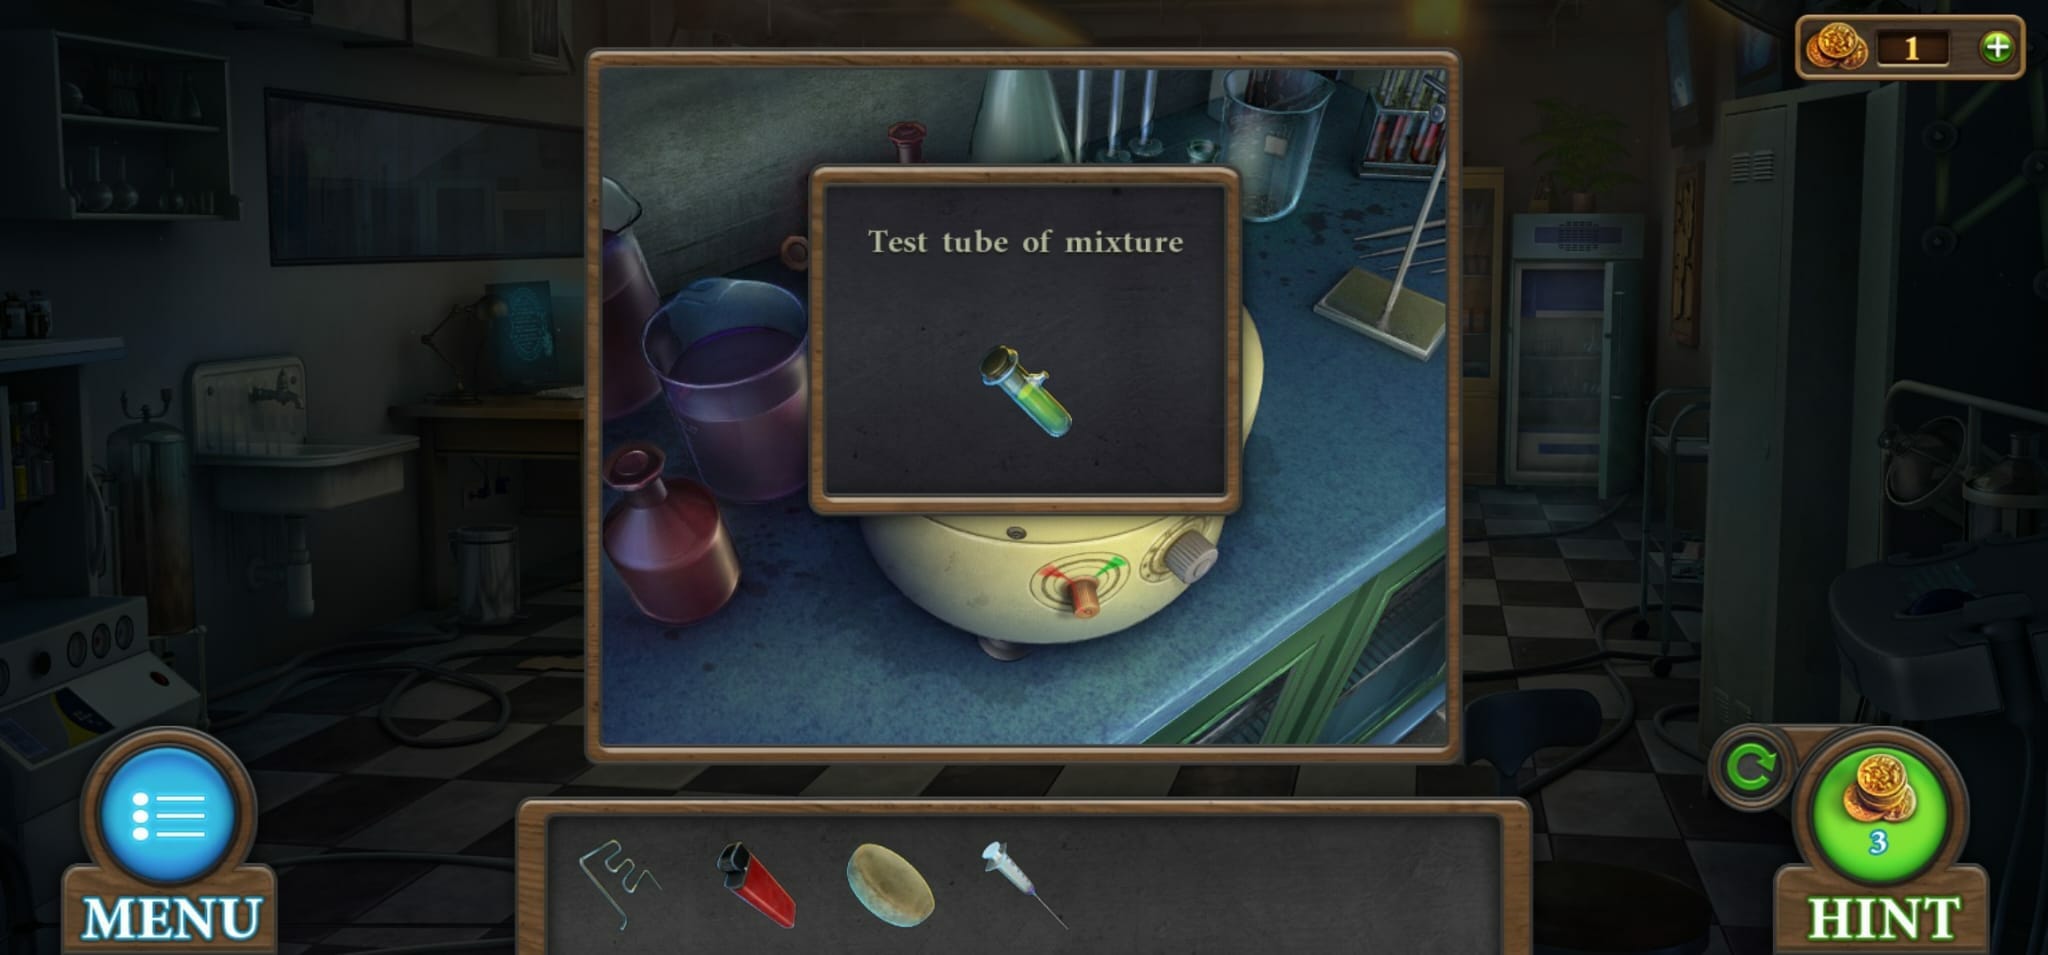
Now you need to go back to the beakers on the left and add the test tube mixture to the middle and put the heat tablet under the tube. You then need to put the glass pipe in between the test tube and the beaker at the end.
Once all that has been done, you can light the bunsen burner with your lighter to make the formula. Once completed, you need to use the syringe on the beaker to extract the medicine.

You can then use the syringe on the werewolf’s arm in the first scene, which will make its hand stay open and you can grab the magnetic key. The magnetic key can be used on the pad on next to the door on the right in the reception. This will show you an X and show that you need to kick a bin.
If you go to the last scene, there is a bin on the floor on the left. Click on it to knock it over and this will also reveal a note underneath which says:
“Running man”

If you go back to the reception, above the last door you need to open, there is an exit sign, which has the running man on it. Click on it to make it larger and you will see the following word:
“Stethoscope”
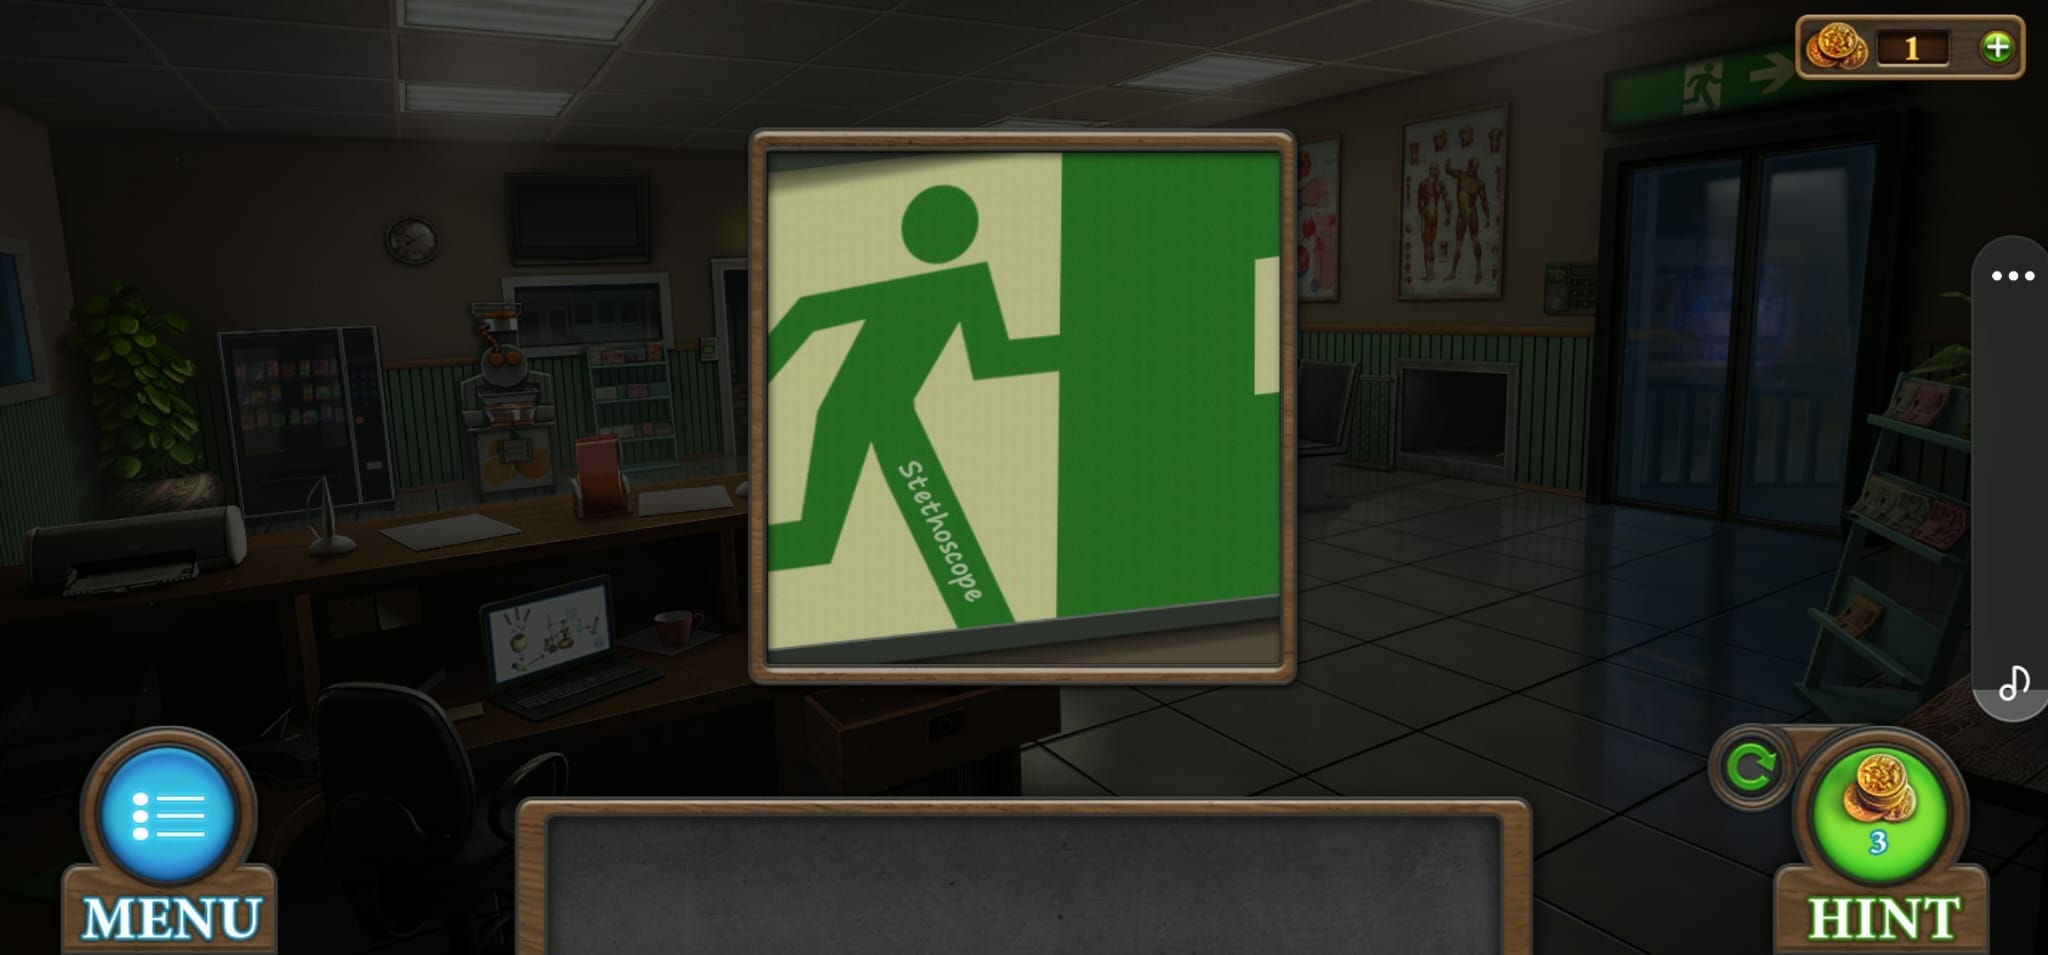
If you go back to the first hospital room, you can click on the stethoscope on the desk. This will become larger and show the bottom, which says the following word:
“Television”
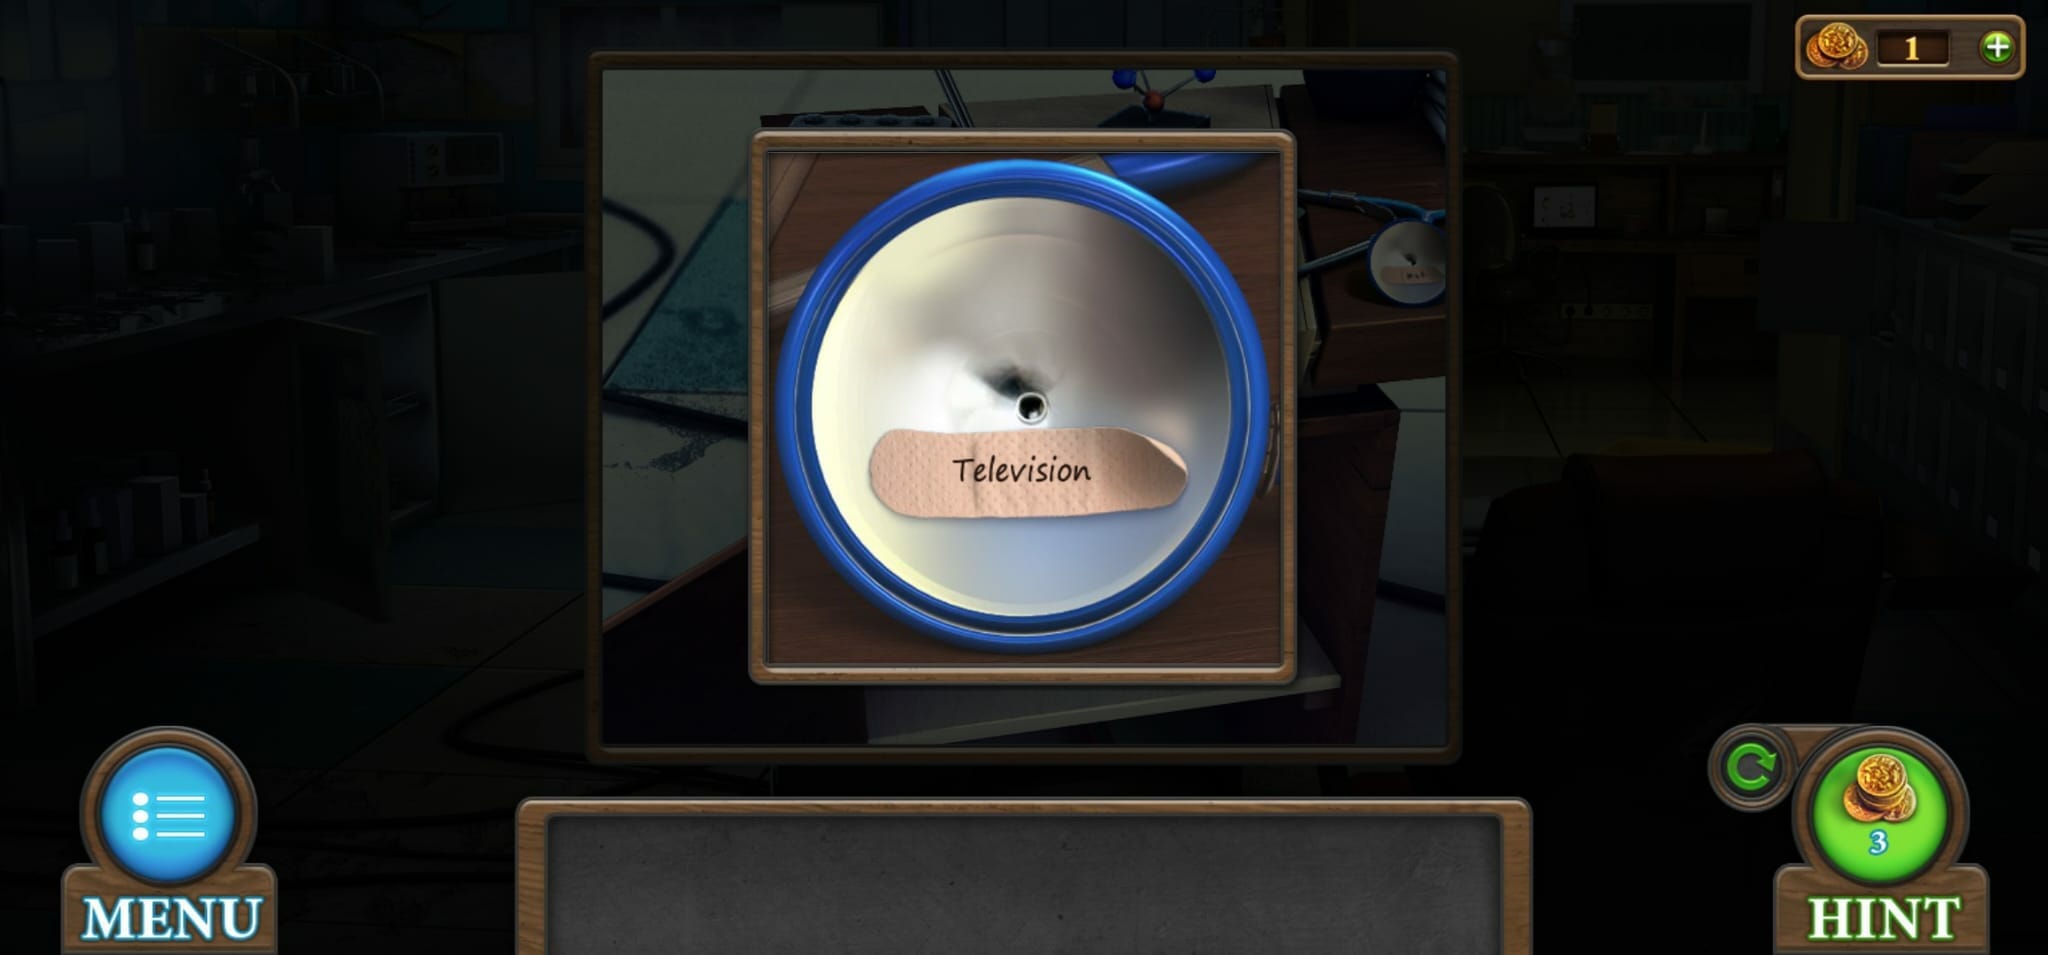
You now need to go back to the reception area, where there is a television on the wall in the back and once you click on it, it will reveal the following words:
“Medical history”

Now if you go back to the patients room and click on the clipboard on the back, it has now changed to show three codes, which are:
- 46721
- 31627
- 54735
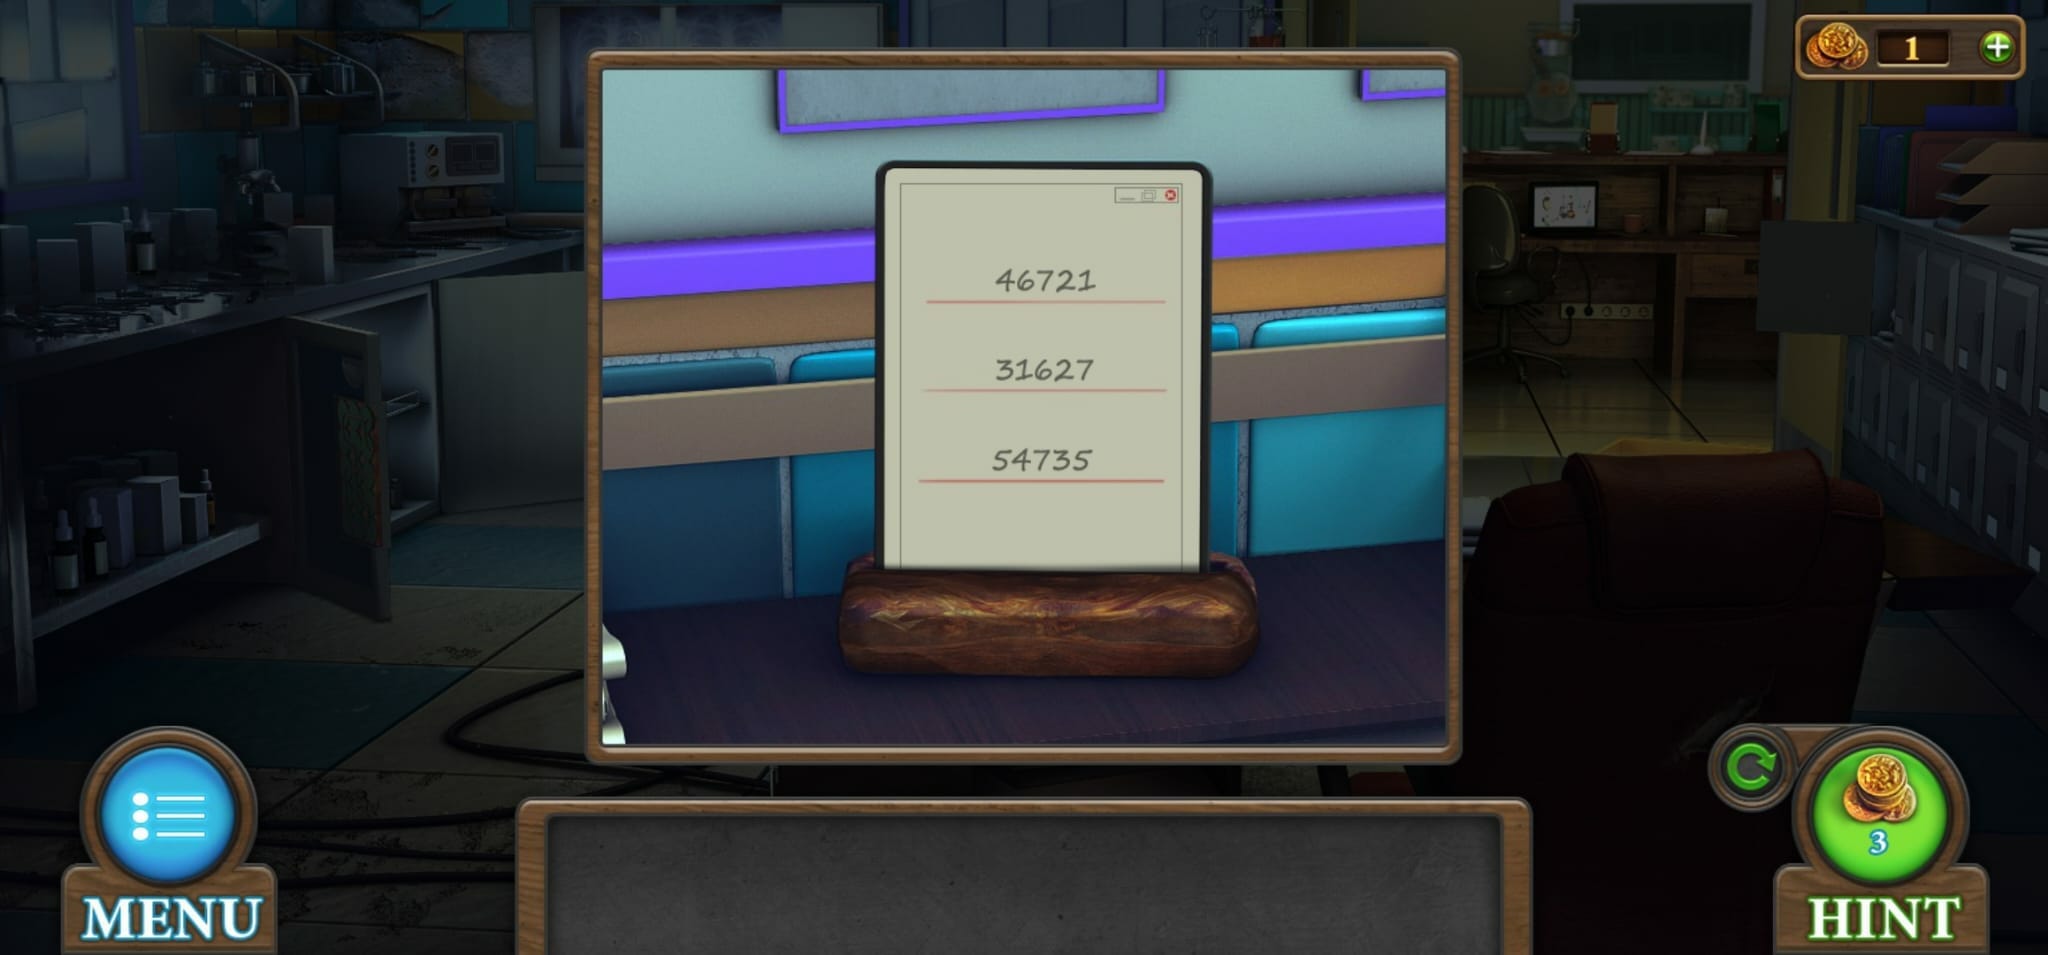
The codes may be different from the ones we have, but it appears as though the code you input on the keypad for the door to exit is always the middle code for the ones you have been given.
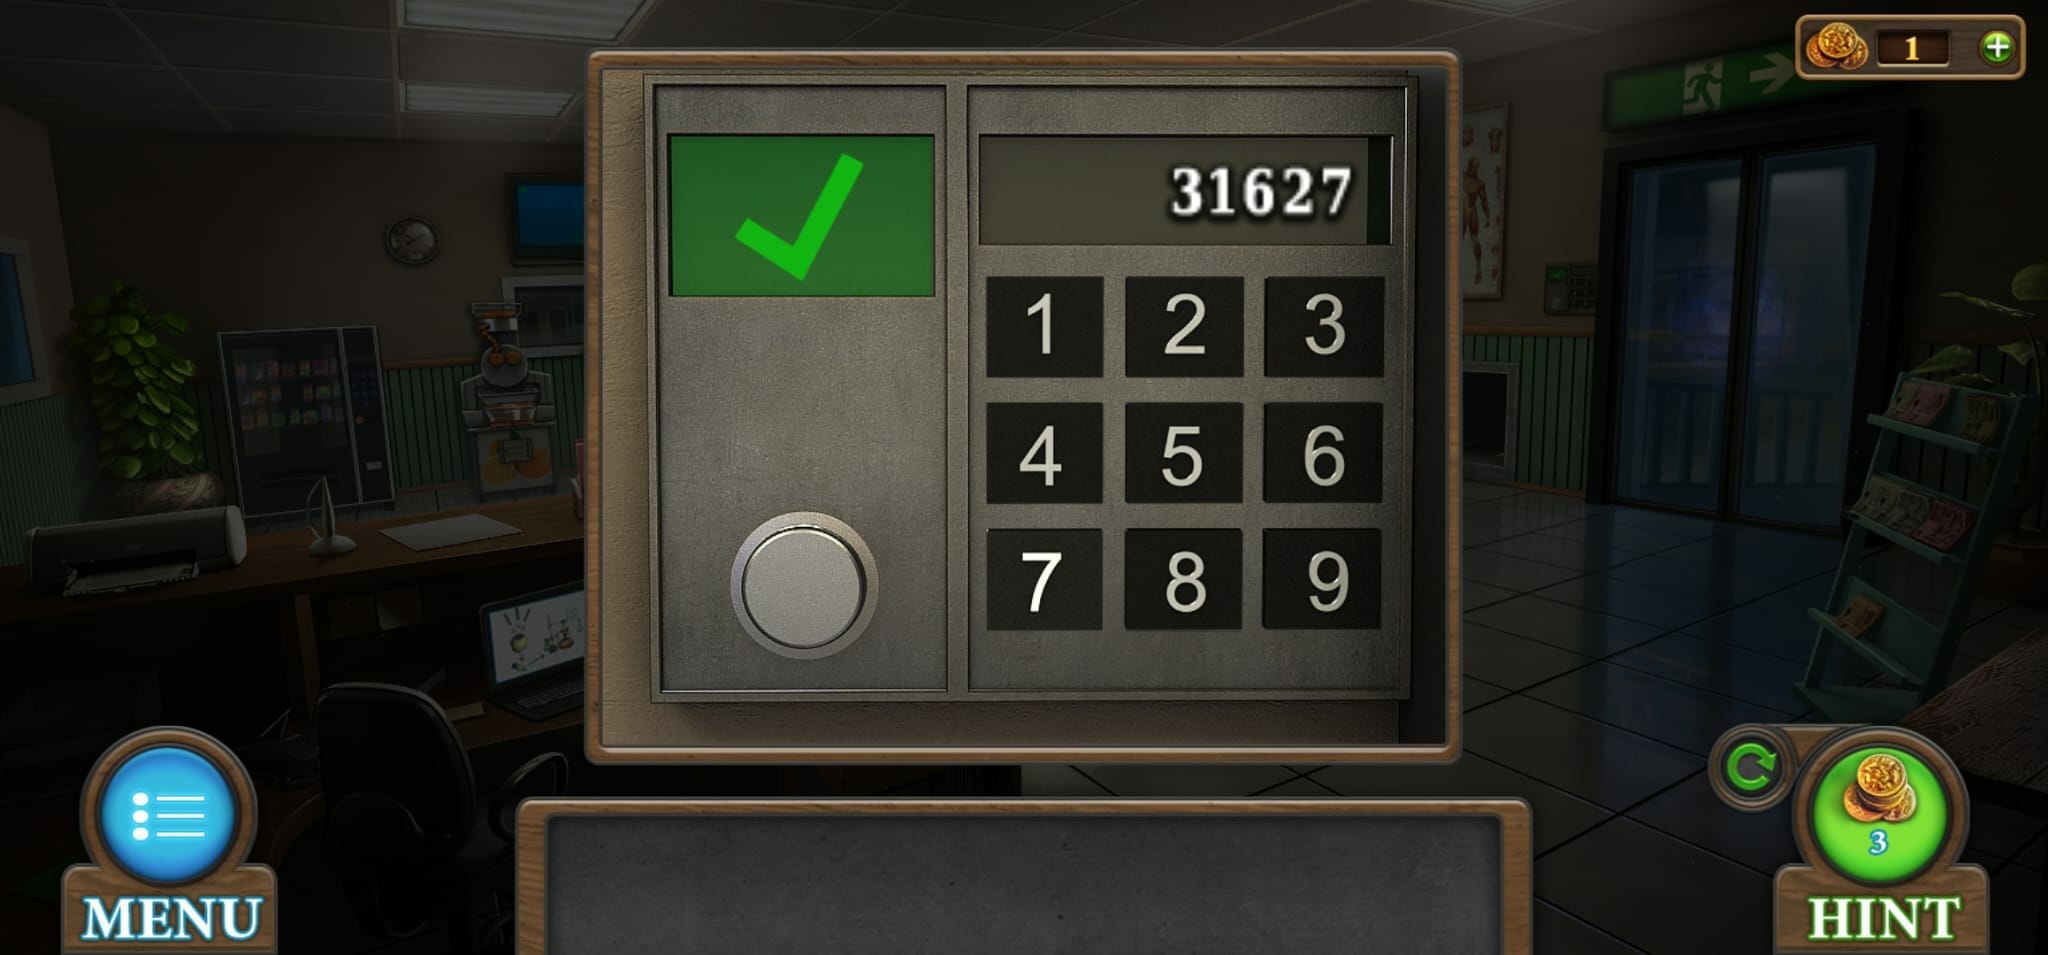
Once you have entered the code, tap on the left and you should see a green tick. This will open the door and you will have then completed level 7 of Tricky Doors!
Click here for the full walkthrough for the next level!


